Stucco Wall Inspection Checklist: Catch Problems Before They Spread
Most stucco damage starts small. A hairline crack near a window corner, a faint stain below a parapet, a patch that sounds different when you knock on it. A good stucco wall inspection checklist catches those early signs before water gets behind the wall and turns a $400 crack repair into a full section replacement. This guide walks you through that checklist the way a local Castle Rock stucco crew would walk your walls, section by section, so you know what to look for, what each sign means, and when to stop guessing and bring in a professional.
This matters whether you own the home you live in or a rental you need to turn over between tenants. Stucco problems do not announce themselves. They spread quietly behind the finish coat, and by the time the damage is obvious, the repair is bigger. Thirty minutes with a checklist twice a year is the cheapest stucco maintenance there is.
Why Inspect Stucco Walls on a Schedule
Stucco is a layered system, not just a coating. Behind the finish you have a brown coat and scratch coat, metal lath or wire fastened to the wall, and a moisture barrier, usually tar paper or a modern equivalent, over the sheathing. The system works as long as every layer does its job. When one layer fails, the layers behind it start taking on work they were never meant to do.
Here is the part most homeowners miss. A structural crack that sits open for years lets the wall flex at that point. Over time the building paper behind the crack gets brittle, and eventually the flexing tears it. Once the paper tears, water has a direct path to the sheathing and framing. The crack you could have sealed in an afternoon becomes water damage repair that involves opening the wall.
Colorado weather makes the schedule matter more. Freeze-thaw cycles pry open small cracks a little wider each winter. Hail bruises the finish coat and knocks loose material free. The National Association of Insurance Commissioners reports Colorado home insurance premiums rose 65% over the last five years, with hail cited as a major driver. Insurers are not raising rates for fun; exterior damage in this state is real and frequent. An inspection habit keeps small hail and weather damage from compounding.
Twice a year works for most homes in Castle Rock: once in spring after the freeze-thaw season, and once in fall before it starts. Add a walk-around after any serious hailstorm.
Stucco Wall Inspection Checklist: What to Look For, Wall by Wall
Work one wall at a time, in good daylight, and get close. From the driveway everything looks fine. From eighteen inches away, you see what is actually happening. Bring a notepad or your phone camera, a flashlight for shaded areas, and something to tap the wall with, your knuckles work fine.
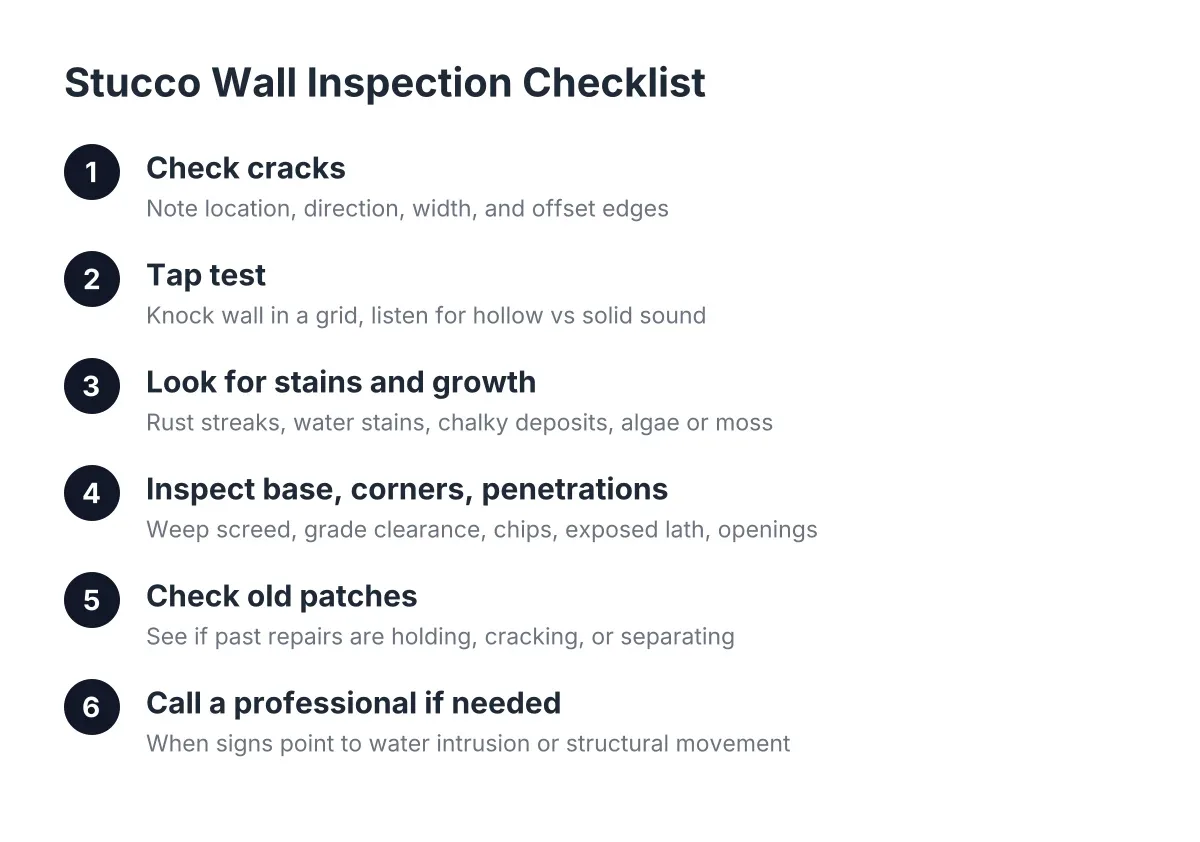
Here is the full checklist. The sections after it explain what each item means and how to judge what you find.
- Cracks: note location, direction, width, and whether edges are offset
- Hollow spots: tap the wall and listen for hollow versus solid sound
- Staining and discoloration: rust streaks, dark water stains, white chalky deposits
- Soft or bulging areas: press gently near the base of walls and below windows
- Window and door perimeters: check sealant joints and the stucco edge at each opening
- Penetrations: hose bibs, light fixtures, vents, cable entries, and railing attachments
- Base of wall: check the weep screed, grade clearance, and drainage at the foundation
- Corners and edges: look for chips, exposed lath, and vibration damage near equipment
- Previous patches: check whether old repairs are holding, cracking, or separating at the edges
- Biological growth: algae, mildew, or moss on shaded and damp walls
Cracks: Reading Direction, Width, and Pattern
Not every crack is an emergency, but every crack tells you something. Hairline cracks thinner than a credit card edge, scattered and shallow, are usually normal curing or thermal movement. Map them with photos and watch whether they grow between inspections.
Pay closer attention to these patterns:
- Diagonal cracks running from window or door corners. These follow stress concentrations at openings and often indicate the wall is moving. They tend to widen over time.
- Stair-step or long horizontal cracks. These can point to settling or movement in the structure behind the stucco, not just the finish.
- Cracks wider than about 1/16 inch, or with offset edges. If one side of the crack sits proud of the other, the stucco has moved, and water is likely getting in.
- Spider-web cracking concentrated in one area. This often means the stucco was hit, by hail or an impact, or the coats are delaminating in that spot.
For wider cracks, a proper repair is more than smearing sealant across the face. The crack needs backing before sealant goes in. Backer rod, a closed-cell foam cord, creates that backing inside the crack so the sealant can do its job, according to Sika. A sealant bead with nothing behind it fails early, and you end up with a shiny caulk line that still leaks.
The Tap Test: Finding Hollow Stucco Before It Falls
The tap test is the single most useful diagnostic a homeowner can do, and it costs nothing. Knock on the wall with your knuckles in a grid pattern, every couple of feet. Solid stucco sounds dense and dull. Detached stucco sounds hollow, like knocking on a drum.
A hollow sound means the stucco has separated from the layer behind it. This happens when a bonding agent was skipped during a past repair, when water worked between coats, or when impact broke the bond. Hollow areas will not reattach themselves. They crack, then chunks let go, usually after a hard freeze.
Mark hollow zones with painter's tape and track them. One palm-sized hollow spot near a corner is a patching job. A hollow zone spreading across several square feet below a window usually means water is behind the wall, and the fix starts with finding the leak, not with the stucco itself.
Stains, Growth, and What Water Leaves Behind
Water always leaves evidence. Rust-colored streaks mean the metal lath or fasteners behind the stucco are corroding, which only happens when moisture reaches them. Dark vertical stains below windowsills, parapet caps, or roof-to-wall intersections mark where runoff concentrates and where flashing may be failing. White chalky deposits, called efflorescence, are minerals that water carried through the stucco and left on the surface as it evaporated. Efflorescence is proof that water is moving through the wall, not just over it.
Green or black growth on shaded north-facing walls is partly cosmetic, but it signals a wall that stays damp. When a shaded wall goes a long time without cleaning, growth embeds deep enough into the texture that a single cleaning treatment will not clear it, and the damp conditions feeding it deserve a look. Check sprinkler heads first; a misaimed rotor soaking the same wall section every morning is one of the most common causes of localized stucco water damage in Castle Rock yards.
Base of Wall, Corners, and Penetrations
The bottom edge of a stucco wall does more work than any other part. Look for the weep screed, the perforated metal strip at the base that lets moisture inside the wall drain out. It should sit above grade with clear space below it. Soil, mulch, or concrete poured against the stucco traps water against the base of the wall and wicks it upward. Soft, flaking, or bulging stucco in the bottom twelve inches almost always traces back to a buried or blocked weep screed.
Corners take impacts from trash cans, mowers, and hail. They also take vibration. Stucco damage at corners near an air conditioning condenser is common, because the unit transmits vibration into the wall; add poor drainage pooling water against the foundation in that same spot, and the corner fails from two directions at once.
In addition, walk every penetration: hose bibs, exterior outlets, light fixtures, dryer vents, and anywhere a railing or awning bolts into the wall. Each one is a hole through the stucco system, and each relies on sealant that dries out and splits over a few Colorado summers. Cracked sealant at a hose bib is a two-dollar fix today and a soggy sheathing problem in three years.
Stucco Wall Inspection Checklist When Checking Old Patches
If your wall already has a repair on it, the patch deserves its own line on the inspection. You are checking two separate things, and they fail for different reasons.
First, is the patch holding physically? Look for hairline cracking inside the patch itself, a gap opening around its perimeter, or a hollow sound when you tap it. A patch that is separating at the edges was not bonded properly. Stucco patch material only bonds to a surface that was cleaned of loose debris, oils, and dust first; skip that prep and the patch is a sticker, not a repair. A failing patch lets water in around its edges, which is worse than the original crack because the damage now hides behind new material.
Second, does the patch match? This is the complaint behind half the calls a stucco repair crew gets: the patch doesn't match, the texture is wrong, the color is close but off, and you see it every time you pull into the driveway. A mismatched patch that is physically sound is a cosmetic problem, and it is fixable. Texture matching means replicating the original application technique, the trowel or spray pattern, the aggregate size, and the finish timing, then floating the new texture past the patch edges so there is no hard line. Color matching on a weathered wall is its own skill; the surrounding stucco has faded for years, so matching the original color chip makes the patch look brand new against an aged wall. On walls with heavy or uneven discoloration, removing a small sample piece for color matching before choosing a finish coat or paint gives a far better result than matching by eye from the ground.
One honest caution: on an older, heavily weathered wall, a perfect invisible match is not always achievable with a spot repair alone. A skilled crew can get a patch to disappear at normal viewing distance, but sometimes the right answer is refinishing the full wall plane to a natural break, like a corner or control joint, so the eye never finds an edge. A contractor who promises an invisible match on any wall, sight unseen, is telling you what you want to hear.
When the Checklist Says Call a Professional
A stucco wall inspection checklist tells you where to look; it does not replace trained eyes on the harder calls. Handle the judgment line this way. Hairline cracks, dried-out sealant joints, and dirt on the wall are homeowner territory. Anything on the list below is a call to a stucco repair professional:
- Cracks wider than 1/16 inch, offset cracks, or diagonal cracks spreading from openings
- Hollow areas larger than your hand, or hollow zones that grow between inspections
- Soft, crumbly, or bulging stucco anywhere, especially at the base of walls
- Rust staining, heavy efflorescence, or any sign of water inside the wall
- A previous patch that is cracking, separating, or that you want blended properly
- Damage after a major hailstorm, before you file or close an insurance claim
That last point deserves a note for 2026. With Colorado's average homeowner premium rate up 57.9% from 2018 to 2023, well above the 33.8% national average according to the Rocky Mountain Insurance Information Association, documenting your walls matters. Dated photos from your spring and fall inspections establish what your stucco looked like before a storm, which makes any later hail claim cleaner for everyone.
Also know what a real repair involves, so you can judge bids. Before any patching, loose and buckling material comes off the wall completely; leaving it in place lets rain keep expanding the damage underneath the new work. Then the substrate gets evaluated, the surface gets cleaned for bond, lath and paper get repaired if torn, and only then does new stucco go on in the proper coats. A bid that jumps straight to "we'll skim it over" is a bid for the patch you will be staring at unhappily in two years.
A Stucco Wall Inspection Checklist Scenario for Rental Owners
Suppose you own a duplex in Castle Rock and a tenant gives notice. You have a three-week vacancy window, and the turnover walkthrough finds a stair-step crack on the south wall and a soft spot below a bathroom window. Run the checklist before you call anyone. Photograph both areas, tap around the soft spot to map how far the hollow sound extends, and check the window's sealant joint above it.
In that scenario, the crack is likely a straightforward stucco crack repair, done in a day. The soft spot below the window is the one that can blow your timeline, because if the tap test shows a wide hollow zone and the sealant above is split, water has been getting in for a while, and the repair may involve opening the wall section. Knowing that before you get bids lets you ask the right question: not "how much to patch this," but "what is behind it, and how long will the full repair take." For a landlord, the difference between a $600 patch and a $3,000 open-wall repair is usually just how many inspection cycles the problem sat through unnoticed.
The same inspection habit pays off on newer properties too. If you are buying or building a rental, the walls deserve a close look in the first year, because new construction stucco and siding can develop curing cracks and flashing issues early, and catching them while the builder warranty is live costs you nothing.
Making the Checklist a Habit
None of this is complicated. Walk the walls in spring and fall, after big hail, and before any sale or tenant turnover. Get close, tap, photograph, and compare against last time. Keep the photos in one folder per wall so growth and change are obvious.
The whole point of a stucco wall inspection checklist is leverage of time, in the plain sense: the earlier you catch a crack, a hollow spot, or a failing patch, the smaller and cheaper the fix. Stucco rewards owners who pay attention twice a year and punishes the ones who wait for a chunk to fall off. Thirty minutes with your eyes close to the wall is the best stucco repair money you will never have to spend.
If you need stucco repair, Castle Rock Stucco Pros can help.
Prefer to talk it through? Call (720) 797-8506 — a quick call is usually the fastest way to get a straight answer for your situation.