Water Damage in Stucco Walls: How Moisture Gets Behind and What Fails First
Water damage in stucco walls almost never starts where you see the stain. Moisture gets in through a crack, a bad flashing joint, or a failed sealant bead, then travels down behind the stucco until it finds wood or paper to soak. Understanding how moisture behind stucco causes damage—whether from a Colorado hailstorm that cracked your wall or from water staining flagged before your listing goes live—tells you what actually needs fixing. Here are eight things that fail, in roughly the order a repair crew checks them.
1. Cracks Are the Front Door for Water Damage in Stucco Walls
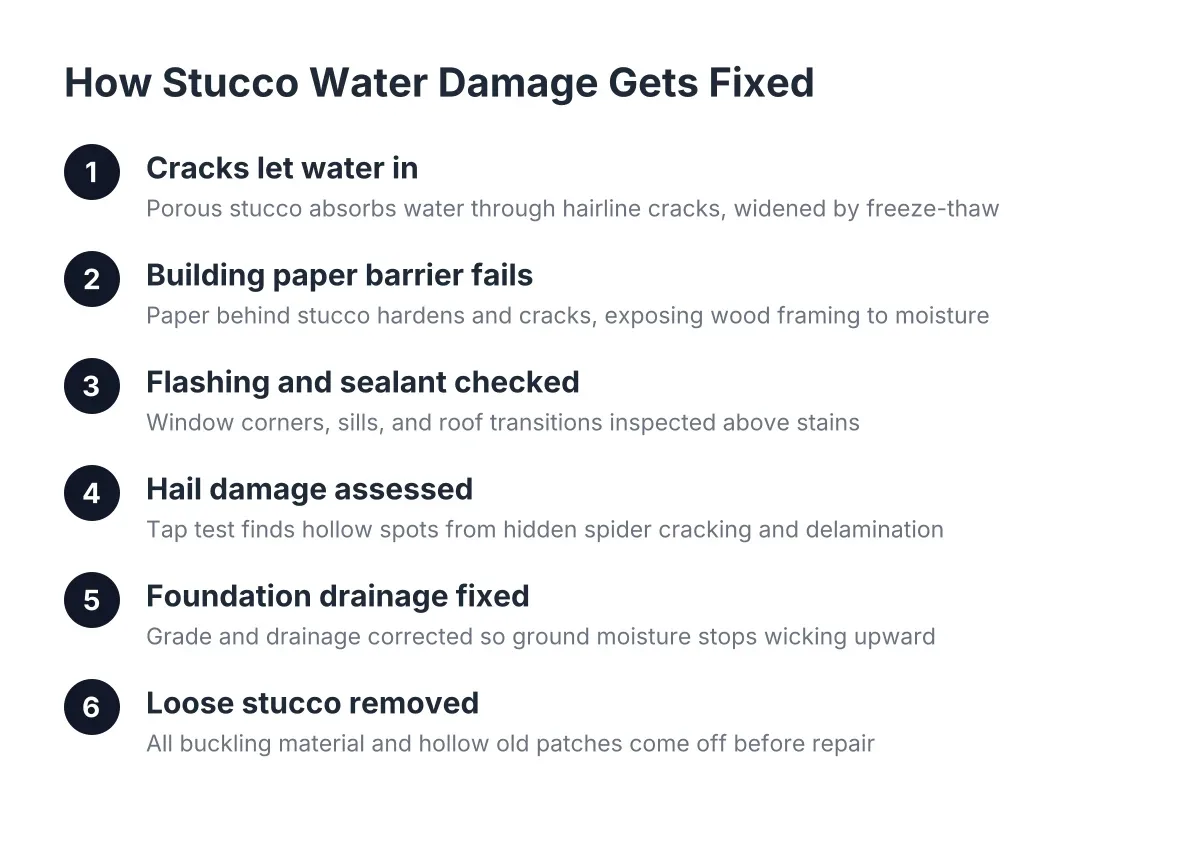
A hairline crack looks harmless, but stucco is porous and absorbs water instead of shedding it the way vinyl siding does. Every crack gives moisture a faster path through the cement layer to the paper barrier behind it. In Castle Rock, freeze-thaw cycles make this worse: water enters the crack, freezes overnight, expands, and widens the crack a little more each winter.
The real risk is time. A structural crack left open for years lets the building paper behind it dry out and turn brittle. Once that paper tears from normal wall flexing, you no longer have a stucco crack repair; you have a water intrusion problem that involves the sheathing behind the wall.
2. The Building Paper Behind the Stucco Is What Actually Keeps You Dry
Most homeowners think the stucco itself is the waterproofing. It is not. A stucco wall is built in layers: a moisture barrier such as tar paper against the sheathing, metal lath or wire fastened over it, and then the stucco coats applied on top. The paper is the true water barrier; the stucco is a tough, weather-resistant skin.
That paper ages. Repeated wetting and drying over decades hardens it, similar to material baking in an oven, until it cracks under stress instead of flexing. When water reaches brittle, torn paper, it hits wood framing next. This is why two cracks that look identical from the sidewalk can mean two different repairs; the one over failed paper costs more.
3. Failed Flashing and Sealant Around Windows Let Water In Above the Damage
Windows and doors are the most common entry points for moisture behind stucco, and the leak usually shows up below the actual failure. Water enters at a failed head flashing or a dried-out sealant joint at the top corner of a window, runs down behind the stucco, and stains the wall a foot or two lower. Homeowners then patch the stain and wonder why it comes back.
Therefore, any water damage repair should start with a look at what sits above the stain: window corners, sill joints, roof-to-wall transitions, and penetrations for vents or hose bibs. Fixing the stucco without fixing the entry point just gives the water a fresh patch to ruin. On sealant work, crews often set a backer rod, a closed-cell foam cord, inside the joint first to give the sealant a proper foundation, a standard practice noted by Sika.
4. Hail Impact Damage Opens Paths You Cannot See From the Ground
Hail does two kinds of damage to stucco siding. The obvious kind is chips and divots in the finish coat. The hidden kind is spider cracking and delamination, where the impact breaks the bond between the stucco and the lath without knocking anything loose. Both let water in; only one shows up in photos.
This matters for storm-damage claims. Hail is a major cost driver in this state; Colorado home insurance premiums rose 65% over the last five years with hail cited as a leading cause, according to the National Association of Insurance Commissioners. Adjusters and contractors sometimes disagree on what counts as damage. A tap test helps settle it: tapping across the wall and listening for hollow sounds versus solid ones is a standard way to find areas where stucco has separated from the substrate. Hollow zones need to come out, even if the surface looks intact.
5. Water Pooling at the Foundation Damages Stucco From Below
Not all water damage in stucco walls comes from above. Poor drainage that lets rain pool against the foundation causes two problems. First, stucco that runs too close to grade wicks ground moisture upward, which shows as staining and crumbling along the bottom edge of the wall. Second, repeated heavy rain soaking the soil near a foundation can cause slight settling, and that settling cracks stucco corners and finishes above it.
Corners take extra abuse when mechanical equipment sits nearby. An air conditioning unit transmitting vibration into the wall, combined with wet soil at the foundation, is a common recipe for cracked and spalling stucco corners. If your damaged corner sits next to the condenser and a downspout that dumps at the foundation, fix the drainage or the repair will not last.
6. Pressure Washing Forces Water Behind the Wall Instead of Cleaning It
Pressure washing works on vinyl siding because vinyl sheds water. Stucco absorbs it. High-pressure spray drives water through the porous surface and into every crack and joint, and because stucco is layered, moisture trapped behind it can build into larger structural problems over time. A wall that looked clean in June can show blistering or staining by fall.
If you are cleaning stucco before listing a home, use low pressure and a wide fan, or wash by hand with a soft brush. In addition, never pressure wash a wall you already suspect has cracks or hollow spots; you are loading water directly into the failure.
7. Loose and Buckling Stucco Has to Come Off Before Any Repair Starts
Once water has been behind a wall, the wood sheathing swells and pushes the stucco outward. The decision rule here is simple: all loose or buckling material comes off before repair begins. Leaving it in place lets every rain keep expanding the wet wood underneath, and the damage spreads under your new patch.
The same rule applies to old patches. A patch that sounds hollow or dents under light finger pressure failed in the material or the application, and it needs to be broken out and redone, not skimmed over. This is where a lot of pre-listing repairs go wrong. Suppose a seller in Castle Pines has a listing date 45 days out and a soft, stained patch of stucco under a bedroom window. A surface skim might cost a few hundred dollars and look fine for the photos, while a proper cut-out, paper repair, and rebuilt patch might run $800 to $2,000 as a rough illustrative range. The skim risks a failed inspection or a buyer credit larger than the honest repair. In that scenario, the cut-out is the cheaper option.
8. A Repair That Ignores Texture Matching Advertises the Damage
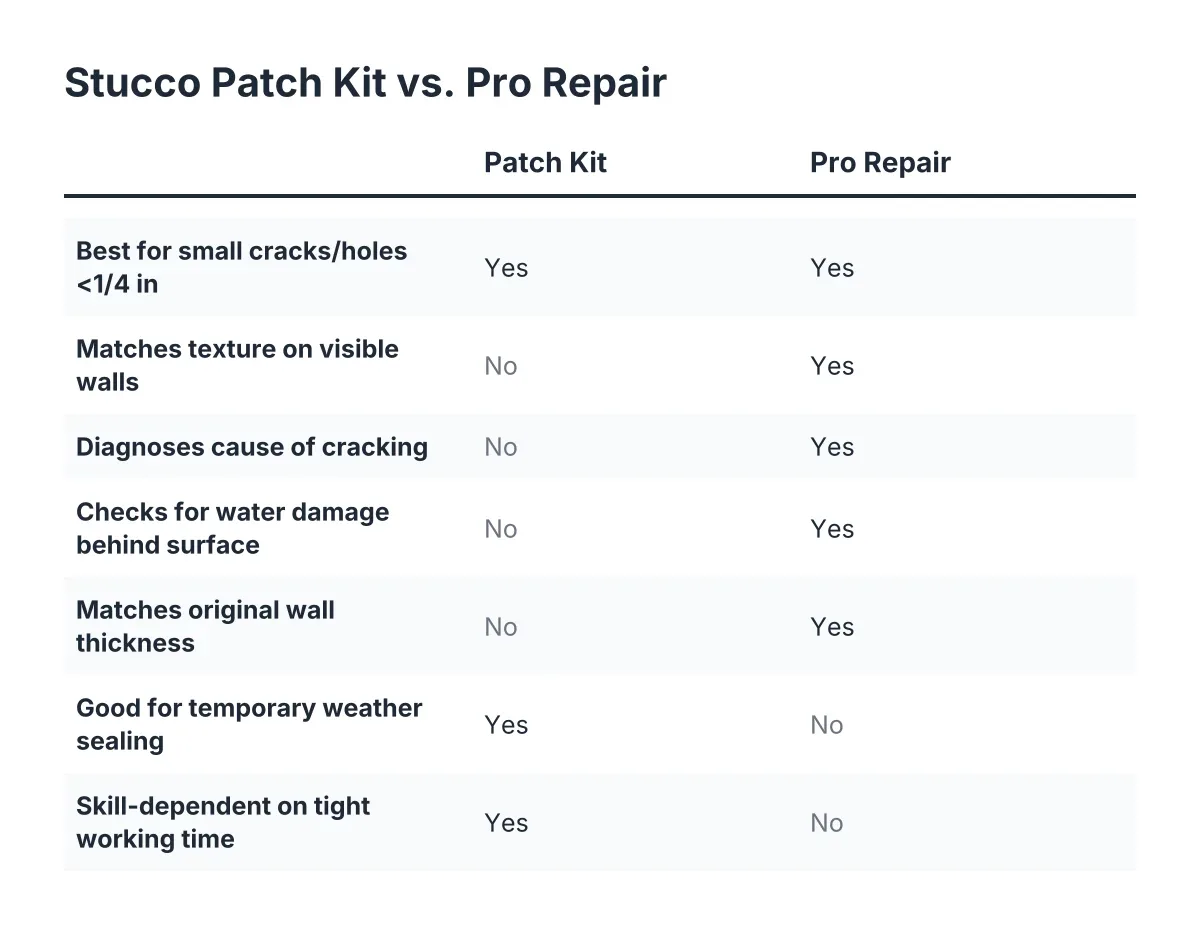
The last failure is cosmetic, and for a seller it may be the most expensive one. A patch with the wrong texture or a mismatched color reads as "this wall had a problem" to every buyer and inspector who walks the property. Texture matching is its own skill: the crew has to replicate the original finish technique, whether that is a sand float, lace, or dash texture, then blend the color so the patch disappears in daylight.
Ask any crew you hire how they handle texture matching before work starts, not after the patch is on the wall. A good exterior stucco repair on a hail-damaged or water-stained wall should be hard to find a year later.
How to Sequence a Stucco Repair When Moisture Behind Stucco Is the Problem
Whether you are responding to storm damage or clearing an inspection item before listing, the order of operations matters more than the speed. A repair done out of order fails; a repair done in order holds.
- Find the entry point first: check flashing, sealant joints, cracks, and grade-level drainage above and around the visible damage.
- Tap-test the surrounding wall to map hollow, detached areas beyond the obvious stain.
- Remove all loose, buckling, or hollow material back to sound stucco.
- Inspect and repair the building paper and any wet or soft sheathing behind it.
- Rebuild the layers: paper, lath, base coats, and finish coat.
- Match the texture and color to the existing wall.
- Fix the cause, whether that is a downspout, a sealant joint, or drainage at the foundation.
One honest limitation: if the tap test reveals hollow areas across large sections of a wall, or if sheathing is rotted around structural framing, patch repair may not be the right call. That is the point to bring in a professional to evaluate whether partial replacement makes more sense than chasing patches, and the same evaluation applies when comparing repair against full new construction stucco and siding on an addition or remodel.
The Bottom Line for Castle Rock Homeowners
Water damage in stucco walls is a sequence, not an event. A crack or a failed joint lets water past the finish; aging paper lets it reach the wood; time turns a $500 crack repair into a wall rebuild. After a hailstorm, walk the house, note every chip and crack, and get hollow-sounding areas checked before winter locks in the moisture. Before a listing, deal with the soft spots honestly, because inspectors find what skim coats hide. Either way, the repair that fixes the entry point, replaces the failed layers, and matches the texture is the one you only pay for once.
If you need stucco repair, Castle Rock Stucco Pros can help.
Prefer to talk it through? Call (720) 797-8506 — a quick call is usually the fastest way to get a straight answer for your situation.