DIY Stucco Siding Replacement vs. Hiring a Local Crew: Cost and Risk
If you are weighing DIY vs hiring stucco siding replacement against a local contractor, the honest answer from a repair-first shop is this: some of the work is yours to do, and some of it will cost you more if you touch it. The line between the two is not about skill with a trowel. It is about what sits behind the stucco, how the patch gets weatherproofed, and whether the finished wall matches the rest of your house. This guide walks you through the decision step by step, so you do not under-scope a water problem or over-scope a cosmetic one.
That matters in Castle Rock for a plain reason. Most stucco damage here traces back to hail, wind, or water getting behind the wall, and the cost of getting it wrong keeps rising. According to the Rocky Mountain Insurance Information Association, the average homeowner's insurance premium in Colorado rose 57.9% from 2018 to 2023, well above the 33.8% national average, driven partly by catastrophic hail losses. A botched wall repair that lets water back in is a claim nobody wants to file.
Step 1: Figure Out What You Actually Have, Repair or Replacement
Before you price anything, confirm which job you are facing. A hairline crack from settling is a repair. A dark stain that will not wash off, stucco that feels soft or crumbly near a window, or a musty smell inside along an exterior wall points to water damage behind the wall. That changes the job.
Press gently on the suspect area. Solid stucco feels like concrete. If it gives, flakes, or sounds hollow when you tap it, water has likely compromised the base layers or the sheathing behind them. At that point you are no longer patching a surface; you may be looking at whether DIY or hiring stucco work makes sense for that wall section, plus drying and possibly fixing the wood underneath.
Here is a simple sorting rule:
- Hairline cracks, small chips, isolated hail dings: repair territory, and some of it is realistic DIY.
- Soft spots, bubbling, spreading stains, crumbling at corners or sills: open-the-wall territory. The cause has to be found and fixed, not covered.
- Widespread cracking, multiple soft areas, or failed stucco across a full elevation: replacement of that section or wall, which is contractor work.
Step 2: Pricing DIY vs Hiring Stucco Work for Your Wall
A small DIY patch is cheap in materials. Patch compound, latex additive, and corner mesh are all stocked at general hardware stores like Home Depot or Lowe's. For a hole the size of your fist, you might spend under a hundred dollars as a rough estimate, plus a weekend.
However, when you consider DIY versus hiring stucco work for a full section, the picture changes. Now you are buying lath, building paper or wrap, base coat, finish coat, and rental tools. You are also buying risk. Scratch and brown coats are harder to apply well than they look; the trade generally treats them as hire-out work, not homeowner work, because a bad base coat cracks and fails within a season or two.
For small projects, a pre-mixed bag of stucco is more practical than mixing sand, cement, and lime the way a mason would for a large wall. That is the right call for a patch. It is the wrong tool for replacing eighty square feet of failed wall, where mix consistency across batches starts to matter.
The Hidden Cost Most DIY Estimates Miss
The biggest line item in a failed DIY job is the redo. Suppose a homeowner in Castle Pines patches over a soft spot below a window without opening the wall. The patch looks fine for a year. Meanwhile the leak at the window flashing keeps feeding the sheathing, and by the time the stain bleeds through again, the rot has spread into framing. A job that might have cost a few thousand dollars in that scenario is now a wall rebuild. Leaving loose or buckled stucco in place has the same effect; rain keeps swelling the wood behind it, and the damage compounds.
Step 3: Know Which Parts of DIY Stucco Replacement Are Safe to Do Yourself
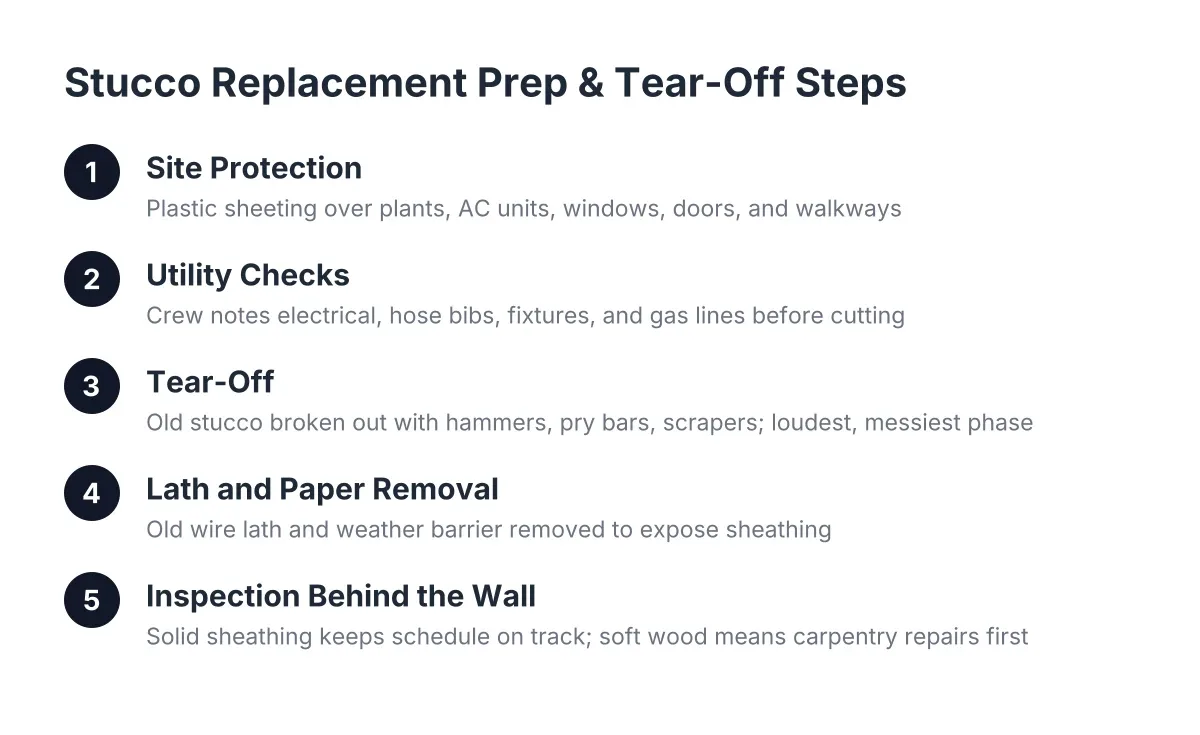
Can you do any of a DIY stucco siding replacement safely? Yes, the demolition and prep side is realistic homeowner work on a small, low wall section, as long as you know where to stop. Cutting out failed material, cleaning the opening, and documenting the damage are tasks that do not risk the weatherproofing of the wall.
If you remove loose stucco yourself, use hand tools: putty knives, scrapers, and wire brushes, with light pressure washing if needed. One detail matters more than most homeowners expect. Do not run a grinder around the opening for a clean edge. A torn, ragged edge leaves the wire lath exposed, which is exactly what a stucco repair crew needs to tie the new lath into the old and weatherproof the patch properly. A clean cut forces them to open up more wall, which adds cost to your job.
Stop at the lath. Once the opening involves the building paper, flashing, or sheathing, you are into the layers that keep water out of your house. Those are the layers that fail quietly and expensively.
Step 4: Price the Contractor Version and What You Are Paying For
When you get a written estimate for stucco repair or section replacement, you are paying for four things that DIY cannot easily buy:
- Diagnosis. A crew that works stucco every week can tell you whether that stain near the window is a flashing failure, a drainage problem, or a crack letting rain in. A patch that ignores the cause comes back.
- Weatherproofing. Lapping new paper over old, tying lath together, and flashing correctly is where repairs succeed or fail. This is the part you cannot see when the wall is finished.
- Texture matching. Blending a new finish coat into fifteen-year-old stucco so the repair disappears takes practice. Even a sound DIY patch usually announces itself. When a patch does not match, a skilled finisher can often knock down and scrape high spots to blend it rather than redoing the base coat; knowing that trick is the difference between a visible scar and an invisible repair.
- Documentation. If a hailstorm drove the damage, your insurance adjuster needs a clear written estimate and photos. Colorado logged 182,591 hail insurance claims from 2013 to 2015, second only to Texas, according to the Rocky Mountain Insurance Information Association. Adjusters here see stucco claims constantly, and a professional scope of work moves a claim along faster than a homeowner's receipt pile.
For section replacement in the Castle Rock area, illustrative pricing often lands in the low to mid four figures depending on wall size, access, and how much rot turns up behind the stucco. Treat that as a ballpark, not a quote; the wall decides the price once it is open.
Watch for Scope Creep in Both Directions
A trustworthy estimate explains what is wrong before anyone swings a hammer. Be skeptical of a crew that wants to start demo without walking you through the problem. At the same time, know that the technically correct fix for a deteriorated corner is often removing the stucco from corner to corner and repatching the full section, not just the damaged spot. That is not upselling; a spot patch on a failing corner tends to crack again. The honest middle ground is a partial patch plus fixing the underlying cause, whether that is drainage, a downspout dumping at the wall, or failed flashing.
Step 5: Decide, Then Match the Material to the Job
Make the call based on scope, not confidence. Use this cutoff:
- DIY makes sense: cosmetic cracks, small patches on sound walls, and prep or demo work on low sections where you leave the lath torn and the paper alone.
- Hire a local crew: anything involving water damage, soft stucco, corners, areas around windows and doors, full-section replacement, or an insurance claim.
If replacement is the answer, material choice comes next. Traditional three-coat stucco is the standard on most Castle Rock homes and takes hail better than synthetic systems. Synthetic stucco, often called EIFS, goes on over foam board and can trap water against the wall if it is detailed wrong, which is why water-damage repairs on EIFS homes need a crew that knows the system. For stucco installation in Castle Rock, CO or stucco installation in Castle Pines, CO, matching the existing system and texture usually beats switching materials on one wall, since a mismatched elevation hurts the look of the whole house.
One honest limitation: no article can see behind your wall. If you have soft stucco, spreading stains, or a musty smell inside, have someone who works with the material look at it before you commit to either a patch or a tear-off. Opening a small inspection area costs little and settles the repair-versus-replacement question with facts instead of guesses.
The Bottom Line on Cost and Risk in 2026
DIY stucco siding replacement saves real money on small, dry, cosmetic repairs, and the prep work is yours if you want it. The risk curve bends hard once water, lath, flashing, or texture matching enters the picture. With Colorado home insurance premiums up 65% over five years, with hail a major driver according to the National Association of Insurance Commissioners, the cheapest wall in 2026 is the one that gets fixed right the first time. Patch what is truly a patch. Replace what is failing. And when the stucco is soft and the stain keeps coming back, put the trowel down and call someone local who does this every week.
If you need stucco repair, Castle Rock Stucco Pros can help.
Prefer to talk it through? Call (720) 797-8506 — a quick call is usually the fastest way to get a straight answer for your situation.