Why Texture Matching Fails in Stucco Repairs: Mistakes Crews Make and How to Spot Them
Most stucco repairs hold up fine structurally. The part that goes wrong is the part you see every day: the texture. Understanding why texture matching fails stucco repairs so often is the difference between a patch that disappears and a patch that announces itself from the street. Stucco repair texture mismatch is one of the most common cosmetic problems homeowners face after storm damage or settling cracks. If you are getting bids after a Castle Rock hailstorm, or you own a rental with cracks that need fixing before the next tenant moves in, this guide walks you through how matching is supposed to work, where crews cut corners, and what to check before you sign off on the job.
The good news first: a mismatched patch is a cosmetic problem, not a structural one. A bad-looking repair can still be a sound repair. The bad news is that a visible patch stays visible after painting, because paint covers color, not texture. Here is the process a careful crew follows, step by step, and the mistakes that break it.
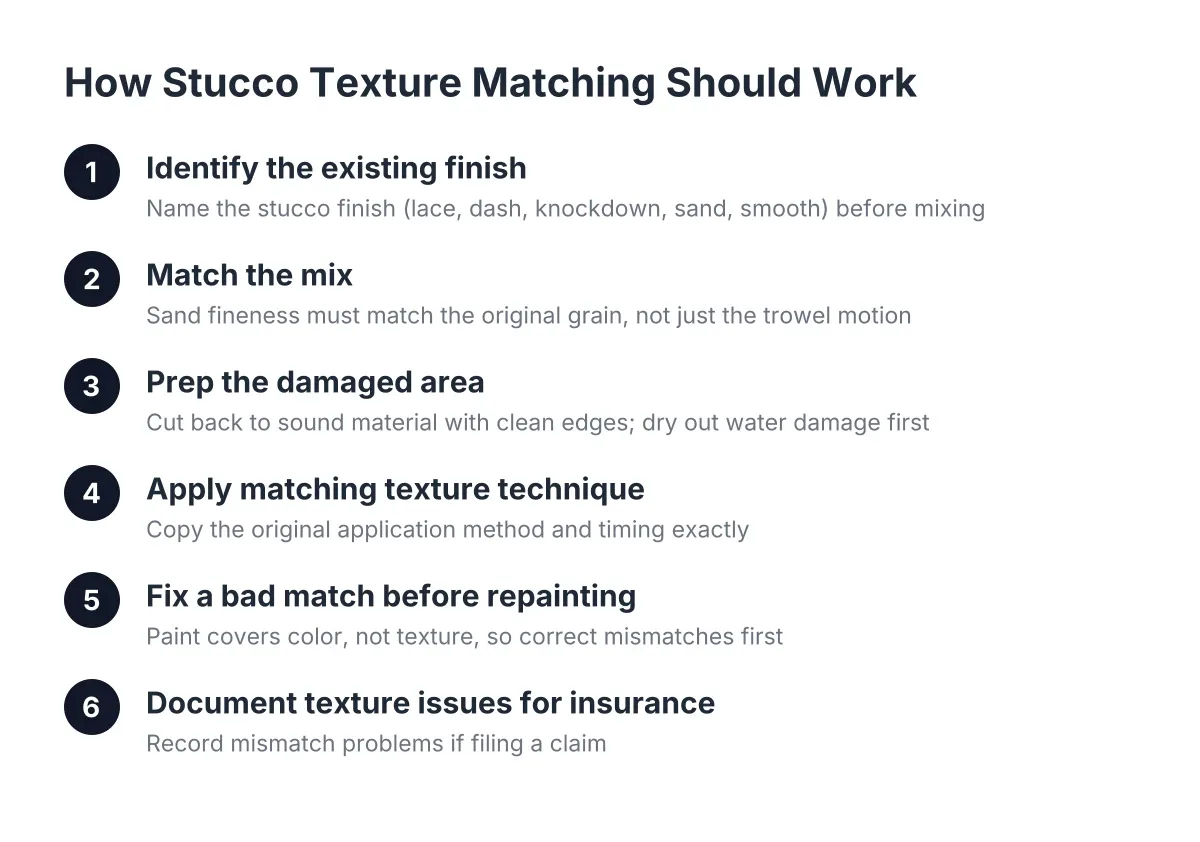
Step 1: Identify Your Existing Stucco Finish Before Anyone Mixes Anything
Every stucco wall has a specific finish, and the repair has to reproduce it. Common finishes in Colorado neighborhoods include:
- Lace stucco finish: a lifted, web-like pattern, sometimes called Spanish lace, applied in two passes and lightly flattened
- Dash stucco finish: material sprayed or flung on and left rough, with a pebbly look
- Knockdown dash: a dash finish troweled down lightly so the peaks flatten
- Sand or float finish: a fine, even grain rubbed out with a float
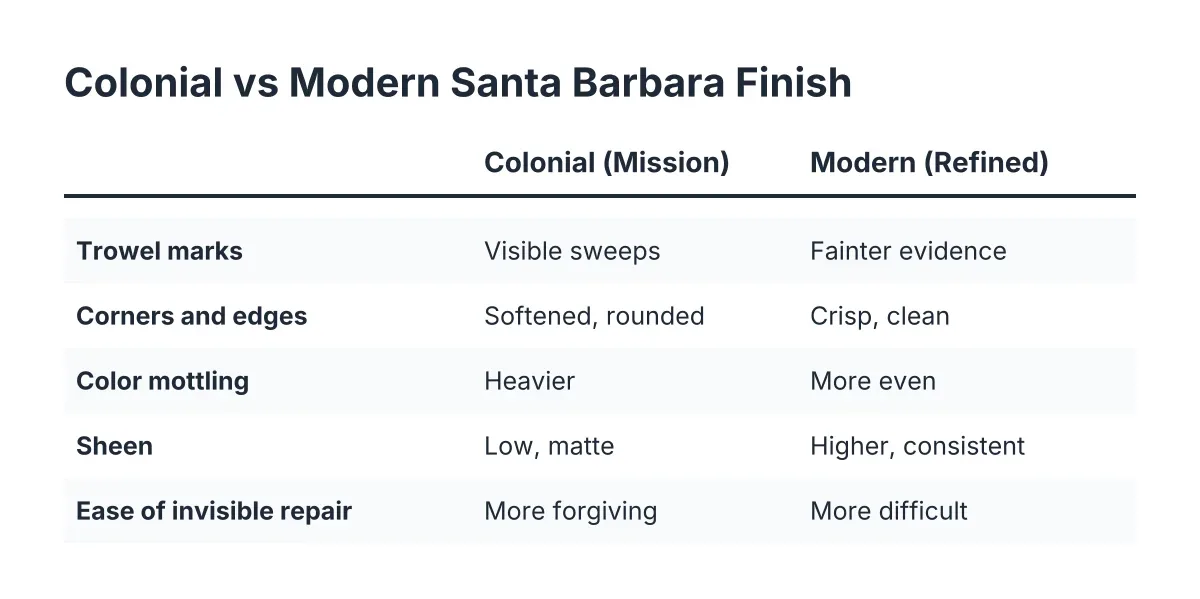
- Smooth or santa barbara: troweled tight with little visible texture
The mistake happens here more often than anywhere else. A crew shows up, patches the hole with whatever technique they know, and the result is a knockdown patch sitting in the middle of a lace wall. When a different worker repairs the wall without matching the original technique, the patch reads as a patch forever. Before work starts, ask the estimator to name your finish. If they cannot, that is a warning sign.
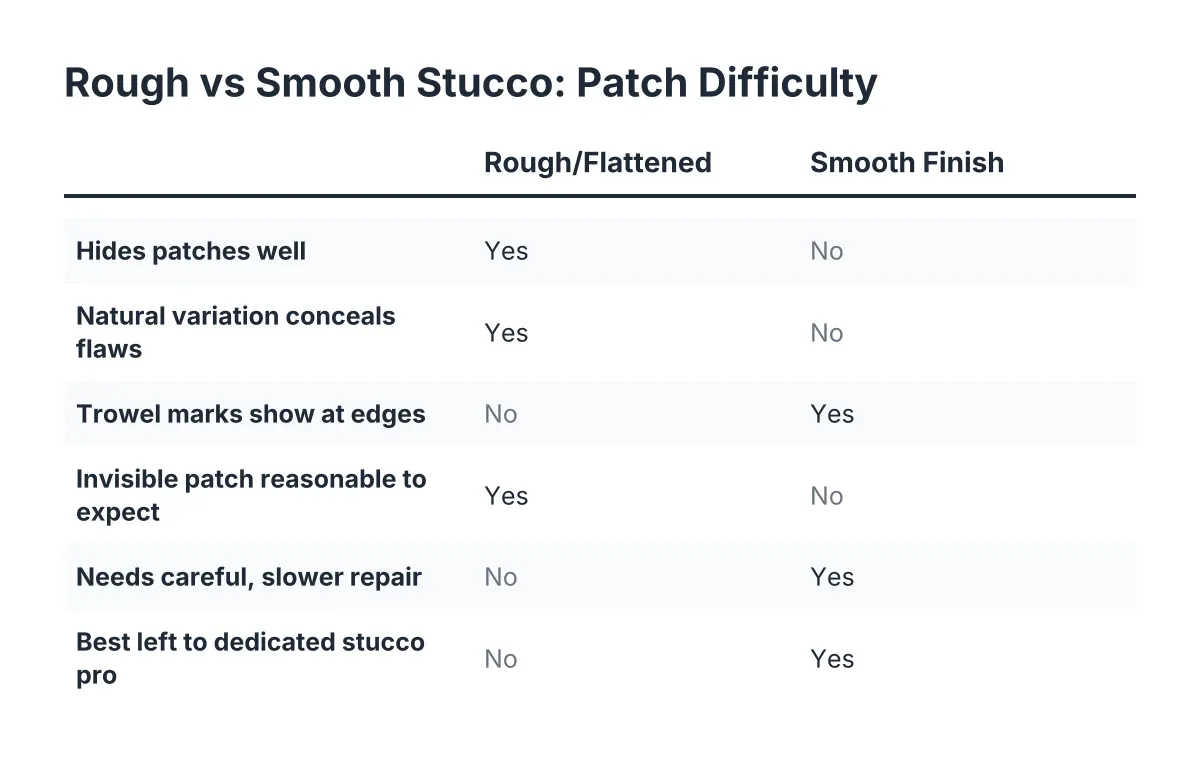
Smoother finishes are less forgiving. A heavy, flattened texture hides small imperfections in a repair, which is part of why stucco is popular in the first place; the texture conceals what a smooth wall would show. However, if your home has a fine sand or smooth finish, expect the matching work to take more care, and budget for it.
Step 2: Match the Mix, Not Just the Motion
Texture is not only technique. It is also material. The fineness of the sand in the mix should match the grain of the existing finish. Coarse sand troweled into a wall finished with fine sand will look wrong no matter how skilled the hand behind the trowel is.
The stucco finish coat is where this matters most. The base coats underneath do the structural work; the finish coat does the visual work. A crew that treats the finish coat as an afterthought, slapping on a generic pre-mixed patch product, is setting up a mismatch. Fiber-reinforced patch products are a common shortcut here. They stand up thick, they resist cracking, and they never quite match the surrounding wall. On a parapet wall nobody looks at closely, that trade-off can be acceptable. On the front of your house, it is not.
For example, say a landlord in Castle Rock has a duplex with hail damage on the street-facing wall and a cracked patch behind the garage. In that scenario, it is reasonable to specify careful stucco texture matching on the visible wall and accept a faster, rougher patch on the hidden one. That is a legitimate cost decision. Just make it on purpose, not because the crew only knows one method.
Step 3: Prep the Damaged Area So the Patch Has Clean Edges
Sloppy prep telegraphs through the finish. Before new material goes on, the damaged stucco needs to be cut back to sound material with clean, defined edges. Loose or crumbling stucco left in place will move under the patch and crack again.
For crack repair specifically, depth matters. Wide cracks need a proper backing before sealant goes in; backer rod, a closed-cell foam cord, creates that foundation inside the crack, according to Sika. Caulk smeared over a surface crack without prep is the version of this job that fails within a season, especially through a Colorado freeze-thaw winter.
Water damage adds a step. If a storm drove moisture behind the stucco siding, the wet material and any damaged backing have to come out and dry before patching. Covering a wet wall traps the problem. This is one place where a homeowner should bring in a professional rather than patch over it, because hidden moisture can rot sheathing you cannot see from outside.
Step 4: Apply the Texture Using the Same Technique as the Original
This is the craft step, and it is where texture mismatches happen in stucco work when the crew rushes. Each finish has its own application method, and the patch must copy it:
- Lace: apply a base pass, let it set slightly, then dab on a second pass and knock it down at the same angle and pressure as the original.
- Dash: spray or fling the finish coat to match the droplet size on the wall; droplet size depends on mix consistency and spray pressure, so test first.
- Knockdown dash: spray the stucco finish coat onto the patch, wait for the right moment, then trowel it down lightly so it blends into the surrounding wall.
- Sand float: float the surface in the same circular or straight pattern as the existing wall, with matching sand.
Timing is unforgiving. Knock down a dash too early and it smears; too late and it will not flatten. Long streaks of texture across a patch, a complaint homeowners raise constantly, usually mean the crew troweled at the wrong time or dragged in one direction instead of matching the wall's pattern.
A careful crew also feathers the patch edges past the repair boundary rather than stopping at a hard line. A patch with a square outline is visible even when the texture inside it is perfect.
Step 5: Fix a Bad Match Before Repainting, Not After
Suppose the patch is done and it still stands out. You have options short of tearing it out. If the patch texture is too heavy, high spots can often be knocked down and scraped to blend with the wall, without removing the base coat. This is a legitimate fix, not a hack, and a competent crew will offer it before proposing full removal.
Color is the other half of the problem. New stucco cures lighter or darker than weathered stucco next to it, so a fresh patch nearly always shows some color difference even when the texture is right. Spot-painting only the patch traps you in the same problem with paint sheen instead of stucco color. Therefore, the standard fallback is painting the entire wall or a full section that ends at a natural break, like a corner or trim line. When the texture cannot be matched perfectly either, painting the full wall is also what makes a close-but-imperfect texture match effectively invisible.
Set expectations here honestly. On some finishes, especially smooth ones, a truly invisible patch without repainting the wall is not realistic. A contractor who promises perfection on a smooth wall without a repaint is overselling.
Step 6: If You Are Filing an Insurance Claim, Document the Texture Issue
Storm damage changes the conversation. Hail is a serious driver of exterior claims along the Front Range; Colorado had 182,591 hail insurance claims from 2013 to 2015, the second-highest total in the country, according to the Rocky Mountain Insurance Information Association. Adjusters see a lot of stucco, and they know matching is the hard part.
When you document hail damage stucco for a claim, photograph more than the impact points:
- Wide shots showing the finish pattern across the whole wall
- Close-ups of the existing texture next to the damage
- Any prior patches that already mismatch, so they are not attributed to the new work
If matching the texture on a patch is not feasible, some claims scope in repainting the full affected wall for uniformity. That is worth raising with your adjuster rather than assuming. With Colorado homeowners insurance premium rates up 57.9% from 2018 to 2023, according to the Rocky Mountain Insurance Information Association, getting the repair scoped correctly the first time matters more than it used to.
How to Tell If Texture Matching Will Fail Before Stucco Work Starts
You can predict most bad matches from the estimate conversation. Ask three questions. First, what finish does my wall have, by name? Second, will you do a test patch or sample area before finishing the whole repair? Third, if the match is not close, what is your plan, knockdown and blend, or repaint the wall section?
An estimator who answers all three in plain terms understands the job. One who says "it'll blend right in" without naming the finish is guessing. In Castle Rock, where most exterior stucco repair traces back to hail, wind, or freeze-thaw cracking, the crews that do this work daily can identify a lace or dash finish from the driveway. That local familiarity with the housing stock is worth more than a low bid from a crew that treats texture as an afterthought, because redoing a failed match costs more than doing it once.
The short version: mismatched stucco repair texture is avoidable when the crew skips shortcuts, identifies the finish properly, uses the correct sand, mistimes the knockdown properly, and paints the full wall rather than spot-painting the patch. Every one of those mistakes is visible from the curb for years if it is not.
If you need stucco repair, Castle Rock Stucco Pros can help.
Prefer to talk it through? Call (720) 797-8506 — a quick call is usually the fastest way to get a straight answer for your situation.