Stucco Texture Types: Identify Your Home’s Finish Before Any Repair Starts
Here is the one thing most stucco repair jobs get wrong, and it has nothing to do with the crack itself. The patch holds fine. The wall is solid. But the texture is off, and now there is a smooth square on a sand-finish wall that catches the light every afternoon. Before anyone mixes a batch of stucco on your property, you should know which of the common stucco texture types is on your home, because that answer controls how the repair gets done and whether you can see it afterward. This matters double in Castle Rock, where hail damage often means several patches on the same wall, and where a home going on the market cannot afford repairs that look like repairs.
The good news: identifying your finish takes ten minutes and no tools. Here are seven things to check, in the order a stucco crew would check them, so you can talk to any contractor with the right vocabulary and spot a weak repair plan before it goes on your wall.
1. Understand why texture, not the patch, is what fails
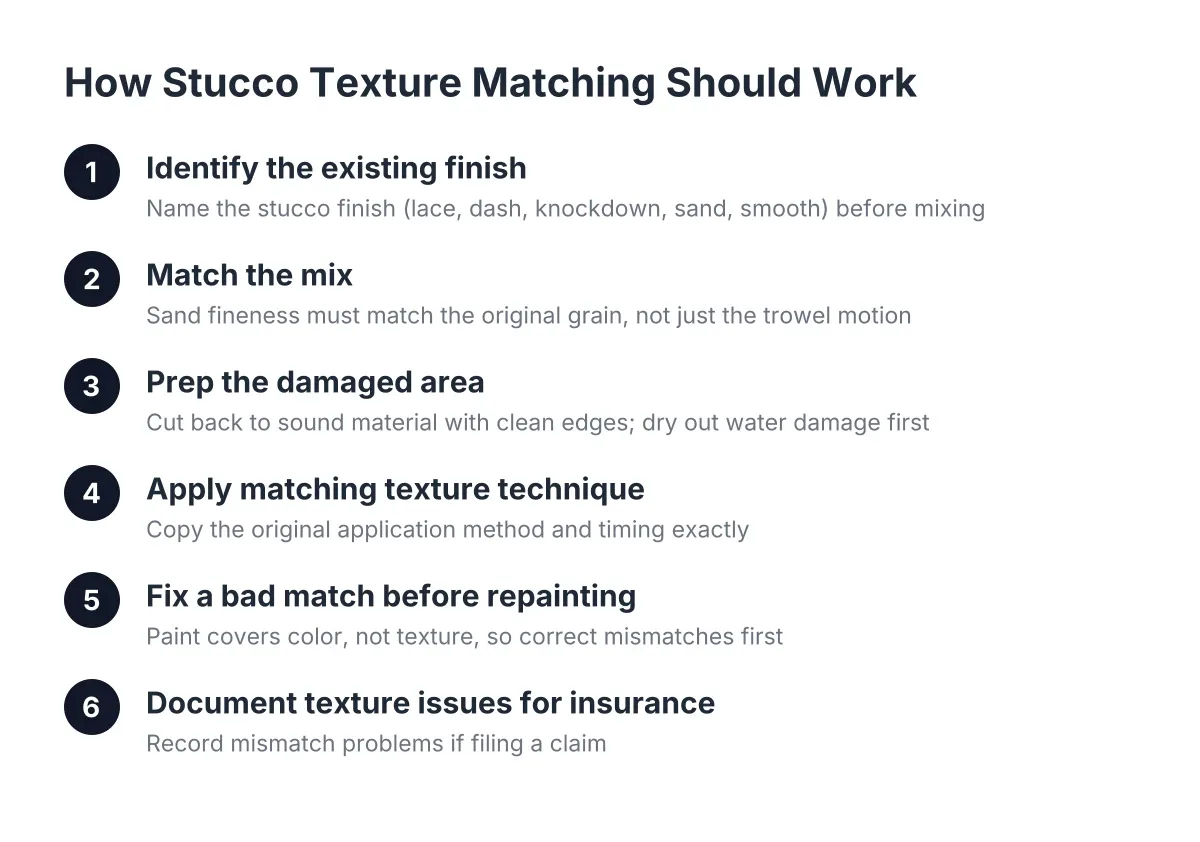
A visible patch is almost never a structural problem. It is a matching problem. The new material bonded fine; it just was not finished with the same technique, the same sand, or the same tool as the original wall. When a patch stands out after painting, it usually means whoever did the repair never identified the original finish before starting.
That is why texture identification comes first, before any talk of price or schedule. A crew that asks about your wall's finish, or walks the house before quoting, is treating stucco texture matching as core to the job. A crew that quotes crack repair over the phone without seeing the texture is planning to leave you a patch you can see from the street.
Keep one thing in mind, though: texture mismatch is cosmetic. If a patch looks wrong but the wall is dry and solid, you are dealing with an appearance fix, not a failure of the repair underneath.
2. Learn the stucco texture types you will actually see in Castle Rock
Most homes around Castle Rock, Castle Pines, and The Pinery carry one of a handful of exterior finishes. You do not need pictures of all thirty variations; you need to recognize these five:
- Sand or float finish. Uniform, gritty, like fine sandpaper across the whole wall. The most common finish on newer Colorado homes.
- Lace or skip trowel. Raised, irregular ridges with flatter valleys between them. Looks hand-worked because it is.
- Knockdown dash. Material is sprayed on, then lightly troweled flat at the high points. Splattered but flattened.
- Dash. Sprayed and left alone. Bumpy, pebbled, no flattening.
- Smooth stucco finish. Troweled tight and flat, sometimes with faint swirl marks. The hardest of all stucco finish types to patch invisibly.
Stand back ten feet and look at the overall pattern first, then get close and run your hand over it. The combination of what you see and what you feel usually settles it. If your wall does not fit any of these cleanly, it may be a custom trowel pattern, and that is worth pointing out to whoever quotes the repair.
3. Check which way your finish tips the difficulty scale
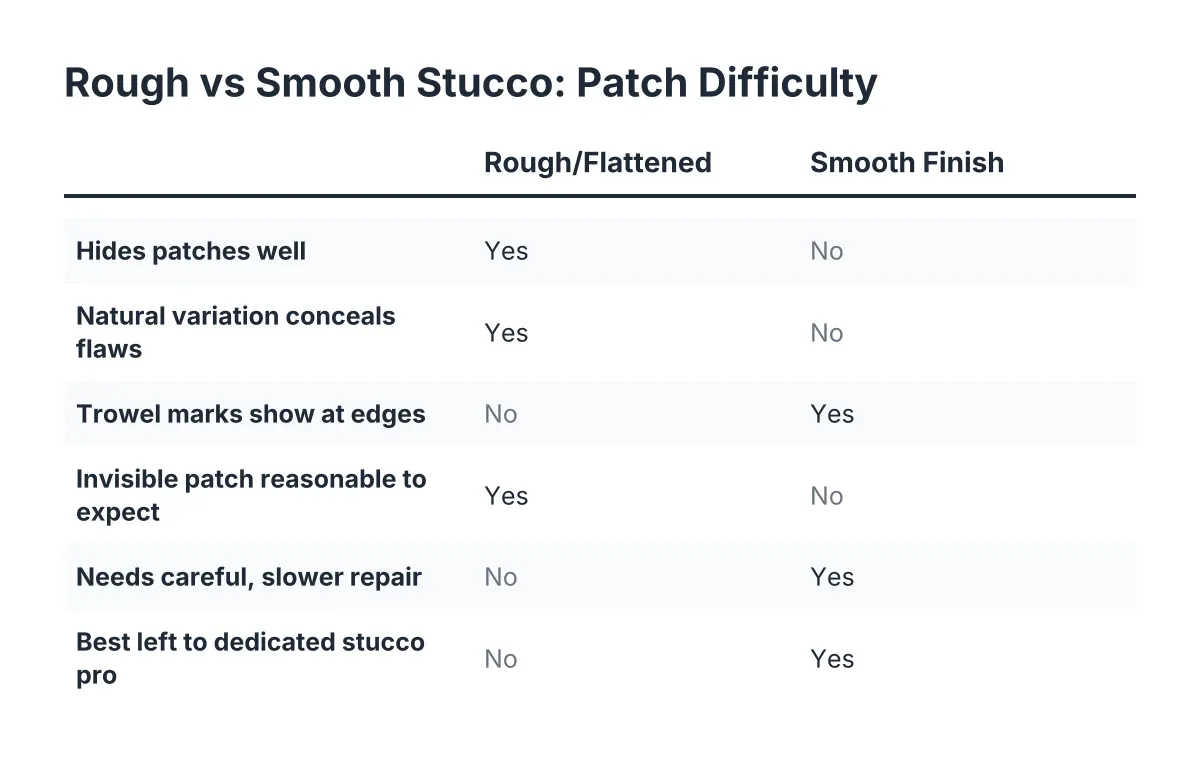
Here is the honest trade-off nobody puts in a quote: rougher, flattened finishes hide patches well, and smooth finishes expose them. A knockdown or lace texture has natural variation, so small imperfections in a repair disappear into the pattern. A smooth stucco finish has nowhere to hide. Every trowel mark, every slight ridge at the patch edge, shows up once the sun hits it at an angle.
This is part of why stucco is popular in the first place; its texture conceals surface imperfections that a flat wall would broadcast. So if you have a sand or knockdown wall, an invisible patch is a reasonable expectation. If you have a smooth finish, ask directly how the crew plans to blend the edges, and expect a more careful, slower repair. On smooth walls especially, this is work for someone who does stucco all day, not a general handyman fitting it between other jobs.
4. Match the sand before you match the technique
Texture is not only about the tool; it starts in the bucket. The fineness of the sand in the repair mix has to match the grain of the existing finish. Coarse sand on a fine sand-finish wall leaves a patch that reads rough even if the troweling is perfect. Fine sand on a coarse dash wall leaves a patch that reads flat.
Therefore, a good sign during an estimate is a contractor who looks closely at your wall's grain, not just the crack. For example, on a typical sand-finish home, the crew should be talking about matching aggregate size before they talk about paint. If the conversation jumps straight to color, texture is being treated as an afterthought.
5. Know how the blending itself is done
Homeowners searching "stucco repair near me" after a storm often assume patching means filling a hole and painting over it. The blending step is where the match actually happens, and it looks different depending on your finish:
- Sand finishes get worked with a float, and often a damp sponge at the edges, to feather the new material into the old grain so there is no hard border.
- Knockdown dash gets a stucco texture spray of finish coat over the patched area, then a light trowel pass to flatten the high points the same way the original wall was done.
- Lace and skip trowel get hand-troweled ridges that continue the surrounding pattern, which takes an eye more than a tool.
- Slightly-off patches can often be corrected by knocking down and scraping high spots rather than tearing out the base coat and starting over.
That last point matters if you already have a bad patch from a previous repair. In many cases it can be blended in place, which is faster and cheaper than removal. Deep cracks are a different story; those may need backer rod, a closed-cell foam cord that creates a foundation inside the crack before sealant goes in, according to Sika. That is a structural prep step that happens before any texture work.
6. Count your patches before you decide on paint
One patch on a back wall is one problem. Six hail hits across a front elevation is a different one, and it changes the right answer. When color or texture cannot be matched perfectly across many spots, the reliable fallback is painting the entire wall or section, so everything reads as one uniform surface instead of a wall of close-but-visible patches.
This comes up constantly with storm damage in Colorado, and the volume is not small. Colorado had 182,591 hail insurance claims from 2013 to 2015, second only to Texas, according to the Rocky Mountain Insurance Information Association. In addition, the National Association of Insurance Commissioners reports Colorado home insurance premiums rose 65% over the last five years, with hail cited as a major driver. So if an adjuster has flagged multiple stucco hits on your home, ask any contractor up front: patch and spot-blend, or patch and repaint the wall? A straightforward answer to that question tells you a lot.
7. Walk your walls at the right time of day
Do your own inspection in raking light, meaning early morning or late afternoon when the sun hits the wall at a low angle. Texture differences that are invisible at noon jump out when shadows stretch across the surface. This is how you find old patches you did not know about, and it is how you should judge a new repair before signing off on it.
Say a homeowner in Castle Pines is listing in 45 days and the pre-listing inspection flags three cracks and a stained patch on the front elevation. In that scenario, the smart move is to photograph each spot in morning light, note the finish type using the list above, and share both with the repair crew. Buyers walk homes in the evening; they will see what raking light shows. A repair judged only at midday can still cost you at the negotiating table.
Why identifying stucco texture types first saves the whole job
Identifying your home's texture before repair prevents the most common stucco repair failure: a solid patch that looks wrong. When the finish type is known up front, the crew can match the sand, choose the right application method, and plan the blend, instead of improvising on a ladder.
It also protects you in two situations Castle Rock homeowners hit often. After a hailstorm, it keeps insurance-driven repairs from turning into a wall of visible dots; you can hand any adjuster or contractor the finish name and the patch count, and the scope conversation gets shorter. Before a listing, it keeps a $500 to $4,000 targeted repair from becoming a buyer objection, because a repair no one can find is a repair no one negotiates over.
The ten-minute version: stand back, name the pattern, touch the grain, count the damage, and check the wall in low sun. Do that before you call anyone, and you will know within the first five minutes of an estimate whether the person quoting your exterior stucco repair actually knows the material or is planning to leave you a square you will stare at for years.
If you need stucco repair, Castle Rock Stucco Pros can help.
Prefer to talk it through? Call (720) 797-8506 — a quick call is usually the fastest way to get a straight answer for your situation.