Stucco Mix Ratios and Ingredients: What’s Actually in a Professional Patch
If you have ever stared at a stucco patch on your own house and wondered why it looks nothing like the wall around it, the answer usually starts in a bucket. The stucco mix that went into that patch, its ratio of cement to sand, the fineness of that sand, and what was or was not added to it, decides whether a repair disappears or announces itself every time you pull into the driveway. This guide breaks down what professional crews actually put in their mix, why the ratio changes from job to job, and why the bag from the hardware store is only part of the story.
This matters whether you are a Castle Rock homeowner looking at a bad patch, a homeowner filing a hail claim after a spring storm, or a builder trying to figure out why one crew's walls look consistent across a subdivision and another's do not. The material is the same. The knowledge behind the mixing is not.
Why a Bad Patch Almost Always Starts with the Wrong Mix
Here is the frustrating truth about most visible stucco patches: the person who did the work probably used decent material. They cleaned the area, mixed a bag of patch compound, troweled it on, and called it done. Six months later the patch is a different color, a different texture, and sits at a different depth than the wall around it.
The failure usually is not laziness. It is a mismatch between the mix and the wall. Stucco is a cement-based material, and cement-based materials are not one-size-fits-all. The sand in the mix has a grain size. The original wall has a texture built from a specific grain size. If those two do not line up, no amount of trowel skill will hide the repair.
Color works the same way. Cement cures to a shade that depends on the mix ratio, the water content, the weather during curing, and the age of the surrounding wall. A patch mixed to a generic recipe will cure to a generic color. Your wall is not generic. It has fifteen or twenty years of Colorado sun, freeze-thaw cycles, and dust baked into it.
So before we talk about fixing a patch that bugs you, it helps to understand what is actually in the bucket.
What Is in a Stucco Mix, Ingredient by Ingredient
A traditional stucco mix has four core ingredients: Portland cement, sand, lime, and water. That is it. Everything else you see on a product label is a modification of that basic recipe.
Each ingredient has a job:
- Portland cement is the binder. It is what hardens and holds everything together. More cement makes a stronger, stiffer mix; too much makes it prone to shrinkage cracking.
- Sand is the body. It gives the mix volume, controls shrinkage, and, critically for anyone trying to match a texture, determines how the finished surface looks and feels.
- Lime is the workability agent. It makes the mix creamy, helps it hold to a vertical wall, and adds some flexibility so the cured stucco can handle small movements without cracking.
- Water activates the cement. Too little and the mix will not spread or bond; too much and it weakens the cured material and lightens the color.
Modern repair products often add a fifth category: polymers. Polymer-modified stucco patch material is stickier than standard mortar because of those added polymers. That stickiness lets it grab a vertical surface and hang without sagging, which is why a single polymer-modified application can replace the old three-coat system for repair work. On a repair, that means no separate scratch coat and brown coat, just one properly built-up patch.
That is genuinely useful. It is also where a lot of bad patches come from, because a convenient product in the wrong hands still produces the wrong texture.
Stucco Mix Ratios: The Recipes Crews Actually Use
The classic ratios are simple to state and tricky to execute. For a traditional three-coat system on new walls, crews typically work around these proportions by volume:
- Scratch coat: about 1 part cement to 3 or 4 parts sand, with roughly a quarter to half part lime. This is the first coat, raked with grooves so the next coat can grip it.
- Brown coat: similar ratio, sometimes slightly leaner on cement, around 1 part cement to 4 or 5 parts sand. This coat builds the wall to its final plane and gets floated flat.
- Finish coat: about 1 part cement to 3 parts sand, often with more lime for workability, and this is where color and texture live.
However, those numbers are a starting point, not a law. A crew adjusts the ratio based on what the wall needs. Suppose a patch has to span between framing bays with no solid backing behind it. In that scenario, a stiffer, richer mud with more cement adds the strength the patch cannot get from backing. A finish coat going on in hot, dry Castle Rock summer wind might get adjusted for workability so it does not flash-set on the trowel.
Sand selection matters as much as the ratio. If your existing wall has a fine, sandy finish, a patch mixed with coarse sand will read as a rough scab no matter how carefully it is applied. The reverse is also true. Matching the fineness of the sand to the fineness of the existing stucco wall texture is one of the quiet skills that separates a repair you can find from a repair you cannot.
Mixing technique is its own variable. Over-mixing changes how the material behaves on the trowel, so crews mix to consistency and then stop. That sounds minor until you watch two batches of the same product cure to different textures because one spent five extra minutes in the mixer.
How Bagged Stucco Mix Compares to a Field Mix
Bagged stucco mix is pre-blended cement, sand, and additives; a field mix is measured on site from separate ingredients. For small repairs, bagged product is the practical choice because the proportions are consistent and the quantities match the job. For full walls, mixing from raw ingredients gives a mason control over sand gradation and ratio that a bag cannot.
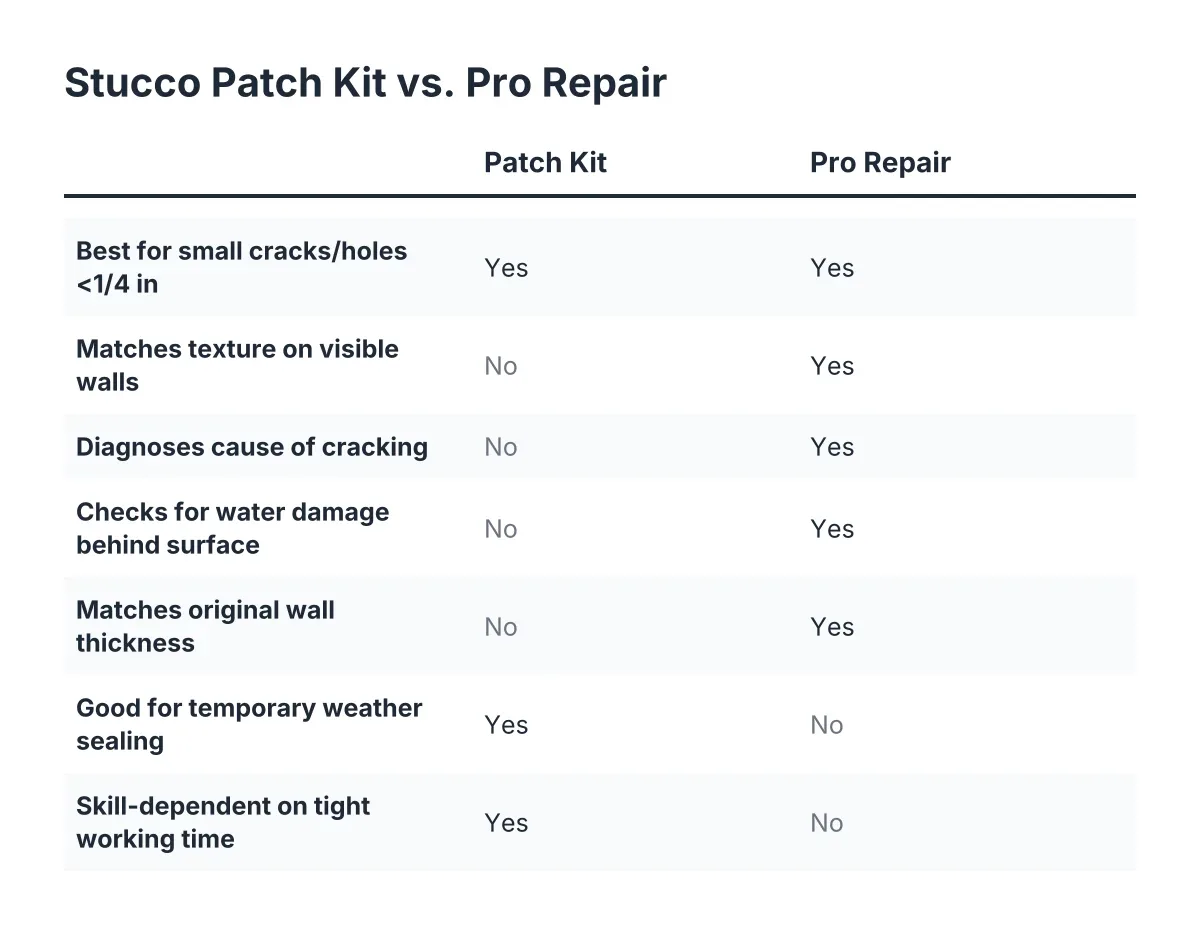
You will find bagged stucco mix at any general hardware store, along with patch compound, latex additive, and corner mesh for small homeowner repairs. Searching "stucco mix near me" will turn up the same handful of national brands at every big-box store. The bag is fine. The bag is not the problem.
The problem is that a bag answers "what do I mix" but not "what does this specific wall need." The bag does not know your wall has a santa barbara stucco finish, a smooth, mottled style with soft trowel marks, or a heavy dash texture, or a fine sand float. It does not know the wall faces south and has bleached three shades lighter than the original color. A professional starts with those questions and works backward to the mix. A quick patch starts with the bag and hopes.
Why the Same Mix Cures to a Different Color on Your Wall
A fresh patch cures to a different color than the surrounding wall because cure conditions, water content, and wall age all shift the final shade, even when the mix is identical. This is the single most common reason homeowners call about a patch that "doesn't match," and it is worth understanding before you hire anyone to redo it.
Three things drive the mismatch. First, water: a wetter mix cures lighter, so two batches of the same product can land shades apart. Second, weather: temperature, humidity, and direct sun during the cure all shift the final tone, and Colorado's dry air and strong sun push cures fast. Third, age: your existing stucco walls exterior have weathered for years, and no fresh material cures straight to a weathered shade.
Therefore, honest texture matching treats color as a separate step from the patch itself. The realistic sequence is: match the texture in the mix and the tooling, let the patch cure fully, then bring the color in line, often by painting the patched area or the full wall section. Anyone who tells you a raw cement patch will cure to an exact match with a twenty-year-old wall is guessing, and you have probably already lived with the result of that guess.
There is a real limitation here worth naming. On an older, heavily weathered wall, a perfect invisible match without any paint is sometimes not achievable, and a trustworthy contractor will say so up front rather than promise a blend and deliver a scar. If a previous repair already sits proud of the wall or used the wrong sand, the fix may mean cutting out the old patch and rebuilding it, not skimming over it. That is a judgment call worth having a local pro make in person.
Matching the Mix to the Texture, Not the Other Way Around
Texture matching starts before the mixer turns on. A crew doing it right looks at the existing wall and works out how that texture was made: what sand size, what tool, what motion, and how many passes. Then they build a mix that can reproduce it.
For example, say a homeowner in Castle Rock has a hand-troweled finish with a light sand texture, and a previous handyman patched a crack near the garage with coarse pre-mix and a swirl of the trowel. The patch is structurally fine. Visually, it is a coaster-sized flag that says "repair here." Fixing it means mixing a finish batch with sand fine enough to match, applying it over the old patch area, and feathering the new material into the edge of the existing texture with a sponge float so the patch line disappears before any paint goes on.
That feathering step is where most quick patches fail. A hard edge between new and old material catches light and shadow, and your eye finds it from the street. Feathered edges blend the transition across several inches, so there is no line for light to catch.
The same thinking applies at the other end of the scale. On new construction stucco and siding work, consistency is the whole game: a builder putting up thirty homes needs the mix ratio, sand source, and finish technique held constant across every wall, because buyers walking the street will spot the one house where the crew changed sand suppliers mid-project. Whether it is one patch or one subdivision, the discipline is identical: decide the target texture first, then build the mix to hit it.
What Storm Damage Does to the Mix Question
Hail changes the repair math because impact damage rarely respects the tidy boundaries of a patch. A hailstorm that chips and cracks a west-facing wall leaves dozens of small wounds across a large area, and each one is a potential mismatch if it gets patched individually with a generic mix.
This is not a rare problem along the Front Range. Colorado had 182,591 hail insurance claims from 2013 to 2015, the second-highest total in the country behind Texas, according to the Rocky Mountain Insurance Information Association. The May 8, 2017 Front Range hailstorm alone caused $2.3 billion in insured damage across roughly 167,000 auto and 100,600 homeowners claims, according to the National Insurance Crime Bureau. Those storms roll through Castle Rock, Castle Pines, and Parker on a regular cycle, and the pressure shows up in premiums: Colorado home insurance premiums rose 65% over the last five years, with hail cited as a major driver, according to the National Association of Insurance Commissioners.
For a homeowner working an insurance claim, the mix question becomes a scope question. Spot-patching forty hail dings with forty small batches produces a polka-dot wall. As a result, a proper storm repair often means patching the impacts, then refinishing or recoating the full affected wall plane so the texture and color read as one surface. That is the kind of detail worth having in the written estimate before the adjuster signs off, because "patch dings" and "restore the wall to a uniform finish" are different scopes at different numbers.
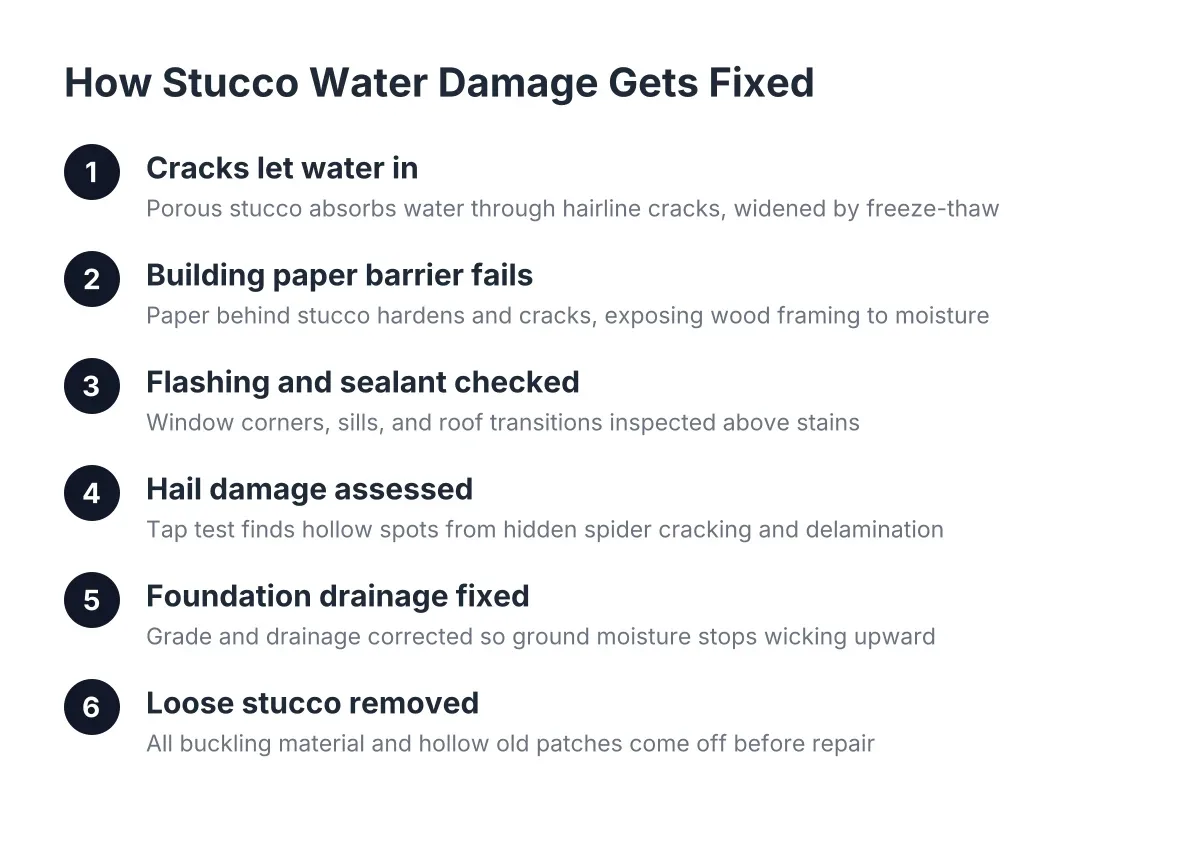
Water damage behind the stucco raises the stakes further. If hail cracks let moisture into the wall, the repair is no longer a surface mix question at all; the damaged material has to come out, the underlying layers have to dry and be rebuilt, and only then does the finish mix matter. Exterior stucco repair after water intrusion is not a hardware-store afternoon, and treating it like one is how small cracks turn into siding replacement.
Questions to Ask Before Anyone Mixes a Batch on Your Wall
You do not need to become a mason to protect yourself from a second bad patch. You need to ask the questions a mason would ask, and listen for whether the answers are specific to your wall or generic to any wall.
- What texture is on my wall now, and how was it made? A pro should be able to name it and describe the tooling, whether it is a sand float, a dash, a lace, or a smooth santa barbara style finish.
- What sand fineness will you use to match it? "Whatever is in the bag" is the wrong answer for a texture-critical repair.
- How will you handle the edges of the patch? Listen for feathering into the surrounding texture, not just "we'll blend it."
- How will you get the color right? A straight answer acknowledges that fresh material cures differently and explains the plan, usually paint after full cure.
- If my wall has an existing bad patch, do you skim over it or cut it out? The honest answer depends on how the old patch was done, and a pro will want to see it before deciding.
In addition, ask how they handle documentation if insurance is involved. A crew that works storm claims regularly will talk comfortably about written scopes and matching the repair area to what the adjuster approved.
None of this is exotic knowledge. It is the ordinary working knowledge of anyone who has spent years with a hawk and trowel in Castle Rock's climate. The gap between a patch you stop noticing and a patch you notice every single day is not the price of the bag. It is whether the person mixing it understood your wall before the water hit the powder.
The mix is simple. Reading the wall is the trade.
If you need stucco repair, Castle Rock Stucco Pros can help.
Prefer to talk it through? Call (720) 797-8506 — a quick call is usually the fastest way to get a straight answer for your situation.