DIY Stucco Patch or Hire a Pro? The Real Cost, Time, and Risk Math
You found a crack, a dark stain, or a soft spot on your stucco, and now you are weighing a choice: DIY stucco patch or hire someone local who knows the material. It sounds like a simple question about money. Spend $30 on a bucket of patch compound, or spend several hundred dollars on a crew. But the real math has three columns, not one: cost, time, and risk. This guide walks through all three honestly, so a Castle Rock homeowner can decide which jobs are worth doing themselves and which ones get worse when you guess.
Here is the short version. Hairline cracks on a dry, sound wall are fair game for a careful homeowner. Soft spots, stains that keep coming back, and anything near a window or downspout are not. The reason is not skill with a trowel. It is what you cannot see behind the wall, and what happens to your repair six months later.
What a DIY Stucco Patch Actually Costs
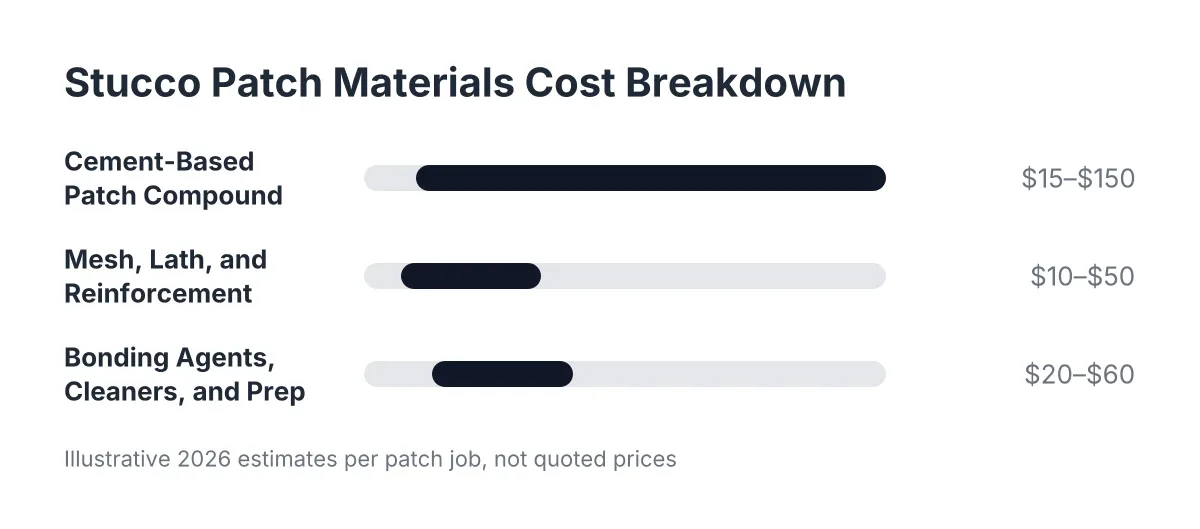
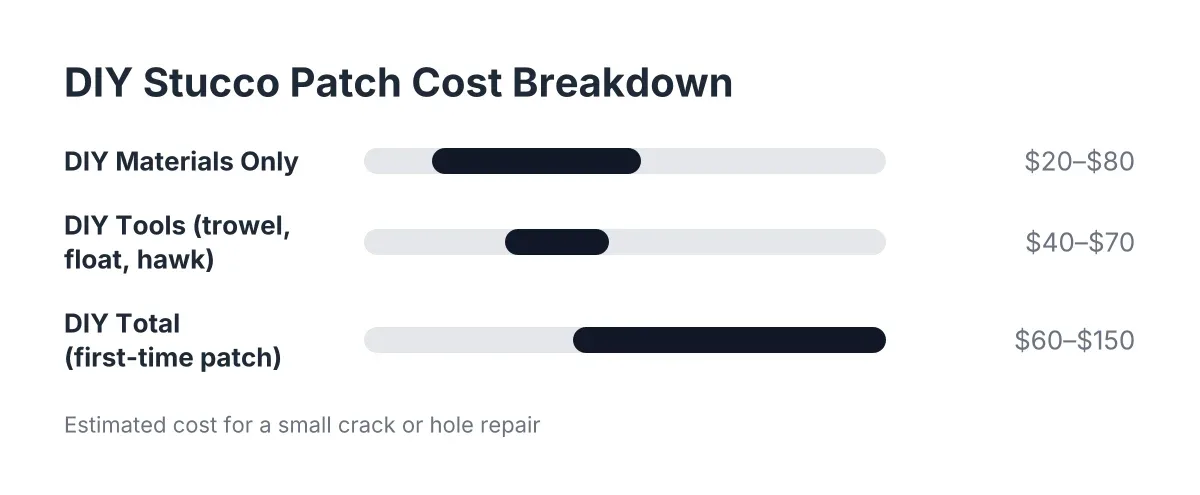
A DIY stucco patch costs between $20 and $80 in materials for a small crack or hole, as a realistic estimate. That covers a tub of polymer-modified patch compound, a caulk-style stucco sealant, and maybe corner mesh if the damage sits on an edge. All of it sits on the shelf at any general hardware store.
The tools add more if you do not own them. A steel trowel, a rubber float, and a hawk for holding material run another $40 to $70 combined. The hawk matters more than people expect for patch work; it is what lets you hold material at the wall instead of walking back to the bucket every pass.
So call it $60 to $150 all in for a first-time DIY patch. That is the number that makes the hardware-store aisle look so appealing. It is also the least important number in this whole decision, and the next sections explain why.
The time cost nobody puts on the receipt
A proper patch is not a one-afternoon job for a non-professional. Done right, you apply one coat, let it set overnight, then come back for the next. Professional crews can run multiple coats in a session because they know how the material behaves as it stiffens. A homeowner trying to match that pace usually ends up with a coat that sags, shrinks, or cracks as it cures.
Plan on two to three short sessions across two or three days. Add prep time: the surface has to be cleaned of loose debris, dust, and any oils, because anything left on the old stucco keeps the new material from bonding. A patch that did not bond looks fine in week one and falls out in year one.
Then there is texture. Matching your home's existing finish is the hardest part of the whole job, and it is the part DIY instructions gloss over. A patch that holds but shows is still a failed patch, especially if your house is heading to market. Any realtor walking a buyer past a gray rectangle on a tan wall will tell you the same thing.
When a DIY Patch Is the Right Call
A DIY stucco patch is the right call for hairline cracks under about an eighth of an inch, on a wall that is dry, sound, and solid when you press on it. If the crack is cosmetic and the stucco around it is hard, a careful homeowner with patience can handle it.
A few things make a DIY repair more likely to hold:
- Clean the crack and the area around it until nothing loose comes off on your hand.
- Use a polymer-modified, rapid-setting patch product made for stucco. These replace the old three-coat system with a single application for repair work, so you skip the scratch and brown coats entirely.
- For wider cracks, build a backing before you seal. Backer rod, a closed-cell foam cord, creates a foundation inside the crack so the sealant has something to press against, according to Sika.
- Apply one coat, stop, and let it set overnight before the next.
- Practice the texture on a piece of scrap or cardboard before you touch the wall.
Notice what is not on that list: anything involving water. That line is deliberate, and it is where the hire-it-out side of the ledger starts.
When the Smart Money Says Hire It Out
Hiring a local stucco repair crew makes sense the moment water enters the picture, or the moment the repair involves new base coats. Those two situations carry most of the risk in this trade, and they are exactly the situations where a $40 patch becomes an expensive mistake.
Soft spots and stains mean the problem is behind the wall
Suppose a homeowner in Castle Rock notices a brown stain spreading below a window sill. She scrubs it. It fades, then comes back after the next storm. Then she presses on the stucco and it gives, spongy instead of hard. In that scenario, the stain is not the problem. The stain is the symptom. Water has gotten behind the stucco, and the question is what it has reached: the paper, the lath, or the framing.
Patching over a soft spot seals the water in. The wall cannot dry, the rot keeps working, and the stain returns through the new patch. Worse, you have now hidden the evidence, so by the time anyone opens the wall, the damage has had another season to spread. Stucco water damage repair starts with finding the entry point, drying what is behind the wall, and fixing the flashing or sealant that let water in. Then the patch goes on.
This is also the honest limitation of any article like this one: nobody can tell you from the outside how far water damage runs. Sometimes opening a soft spot reveals a small fix. Sometimes it reveals rotted sheathing that changes the scope. A straightforward local contractor will tell you what they found and what it changes before demo goes any further, not after.
Base coats are harder than they look
Applying scratch and brown coat stucco looks like spreading mud. It is not. Mix ratio, suction control, coat thickness, and timing all have to be right, and experienced plasterers generally agree this is work to hire out rather than learn on your own house. If the damage is deep enough that you are rebuilding the wall system rather than skimming the surface, the DIY window has closed.
Texture matching is where DIY patches get caught
A poor texture match almost always means someone repaired the wall without matching the original technique or finish type. Every finish, from sand float to lace to dash, is applied with a specific motion and tool. Local crews that do stucco patching every week have practiced those motions. A first-timer gets one try on a wall the whole street can see.
For a pre-listing seller, this is the whole ballgame. The point of fixing cracks before an inspection is to remove the question from the buyer's mind. A visible patch raises the same question the crack did, sometimes a louder one, because now the buyer wonders what the patch is covering.
The Cost Side: What Hiring Actually Runs
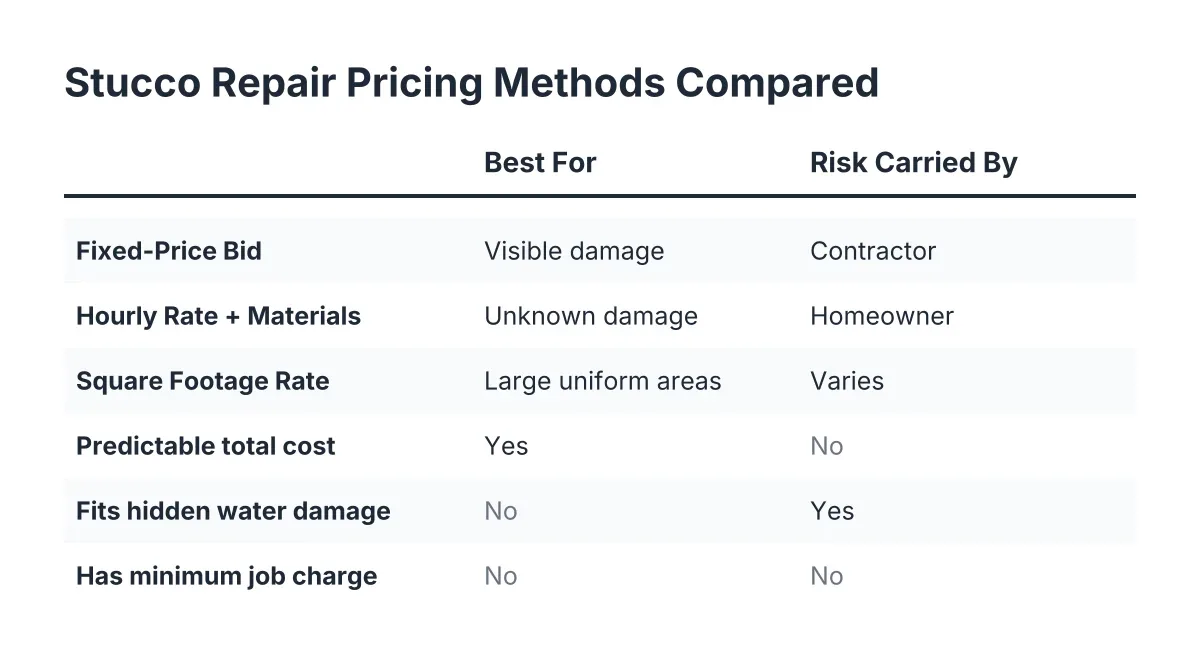
Professional stucco crack repair for small, straightforward jobs commonly lands in the low hundreds of dollars, while patching a damaged section with texture matching typically runs from several hundred into the low thousands depending on size, access, and what sits behind the stucco. Those are illustrative ranges, not quotes; every wall is different, which is exactly why vague over-the-phone estimates are worth so little.
What drives stucco repair cost up or down is concrete and worth knowing before you call anyone:
- Size and depth of the damage. A surface crack costs less than a repair that rebuilds lath and base coats.
- Water involvement. If the wall has to be opened, dried, and reflashed, labor goes up. Skipping this step is how cheap quotes stay cheap.
- Texture and color matching. A simple sand finish matches faster than heavy lace. Color matching aged stucco takes skill and sometimes a finish coat over a larger area so the repair blends.
- Access. Ground-floor repairs cost less than second-story work that needs staging.
- Edges and corners. Corner damage done technically right means removing stucco and repatching the full wall section from corner to corner, not dabbing material on the broken spot. Quotes that skip this are quoting a different, shorter-lived repair.
One more cost factor that surprises people: a bad DIY attempt can raise the price of the eventual professional fix. For example, if someone cuts out damaged stucco with a clean grinder line, the chicken wire lath gets severed flush. A repair crew needs that lath exposed and torn so they can tie the new patch in and weatherproof it properly. A clean cut forces them to open up more wall, and you pay for the extra square footage your own prep created.
DIY Stucco Patch vs. Hire: The Risk Column
The risk comparison for a DIY stucco patch versus hiring comes down to one question: what happens if the repair is wrong? For a cosmetic hairline crack, the answer is almost nothing. You redo a $15 tube of sealant. For a wall with water behind it, the answer is rot, possible mold, and a bigger repair bill than the one you avoided.
Colorado weather raises the stakes on exterior repairs generally. Hail is a major driver of home insurance costs here; Colorado premiums rose 65% over the last five years with hail cited as a leading cause, according to the National Association of Insurance Commissioners. Walls take hits along with roofs, and the freeze-thaw cycle works on every unsealed crack each winter. Water gets in, freezes, expands, and widens the crack. A patch that fails in October gets tested hard by March.
There is also the cause behind the crack. A patch, DIY or professional, treats the symptom. If the crack came from a drainage problem, a leaking downspout, or settling, it comes back until the cause is fixed. A crew that works on stucco siding every week will usually spot the cause during the estimate. A patch kit will not.
A side-by-side for the fence-sitters
However you lean, it helps to see the two paths next to each other for a typical small repair:
- Cash outlay: DIY wins on paper, $60 to $150 versus a few hundred or more for a pro.
- Time: DIY takes two to three days of staged coats plus prep. A professional crew often finishes a small patch in one visit because they can work the coats in sequence.
- Texture match: Strongly favors the pro on anything visible from the street.
- Diagnosis: Only the pro path includes one. The patch kit assumes you already know what is wrong.
- Failure cost: Low for cosmetic cracks, high for water damage, and highest when a failed patch hides the problem until a buyer's inspector finds it.
As a result, the honest answer is not "always hire" or "always DIY." It is "match the method to the wall."
A Simple Decision Test Before You Buy the Bucket
Before you spend anything, run four checks. They take ten minutes and they sort most repairs cleanly.
- Press test. Push firmly on the stucco around the damage. Hard everywhere means the wall system is likely sound. Any give, flex, or crumble means water, and water means hire.
- Stain test. A stain that returns after cleaning, or darkens after rain, is water moving through the wall. Hire.
- Location test. Damage within a foot of a window, door, downspout, or roofline sits where water concentrates. Treat it as suspect even if it feels hard today.
- Size test. Hairline to an eighth inch, on a flat field of wall, is DIY territory. Wider, deeper, or on a corner, get a local set of eyes on it.
Two or more hire signals means stop shopping for patch compound. The money you save on the bucket is not worth what the bucket can hide.
Where This Leaves a Castle Rock Homeowner in 2026
The decision between a DIY stucco patch and hiring is clearer than the internet makes it sound. Hardware-store products are genuinely good in 2026; single-application polymer patches do work for the jobs they are made for. The failure point is almost never the product. It is the diagnosis, the prep, the texture, and the water nobody checked for.
Therefore, the practical path looks like this. Handle the hairline stuff yourself if you enjoy the work and the wall passes the press test. Hire local, focused stucco help for anything soft, stained, structural, or on display, and hire it from someone who will explain what is behind the wall before demo starts, not after. A contractor who starts with answers instead of a sledgehammer is the one worth having on a Castle Rock wall, whether you are fixing a stain that has bothered you for a year or clearing a repair list thirty days before your home hits the market.
Either way, do not let the crack winter over. In this climate, waiting is the one option that always costs more.
If you need stucco repair, Castle Rock Stucco Pros can help.
Prefer to talk it through? Call (720) 797-8506 — a quick call is usually the fastest way to get a straight answer for your situation.